
Create website search engine in php
in PhpCreate website search engine in PHP Why a search engine on your website? What requirements mus..
15-01-2023 0 reacties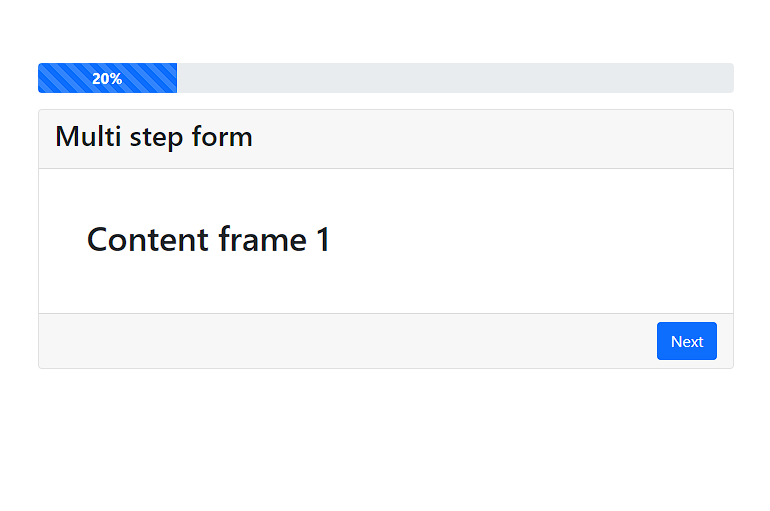
Today we are going to make a responsive multi step form with bootstrap 5 and jquery. The multi step form consists of 5 steps and has 2 buttons "back" and "next". At the end we display a "done" button on which the multi step form is reloaded when clicked. In this tutorial I assume that you already have knowledge of HTML, CSS and JavaScript.
First we create an html website in which we place the necessary bootstrap and jQuery files.
<!DOCTYPE html>
<html>
<head>
	<link href="https://cdn.jsdelivr.net/npm/bootstrap@5.0.2/dist/css/bootstrap.min.css" rel="stylesheet" integrity="sha384-EVSTQN3/azprG1Anm3QDgpJLIm9Nao0Yz1ztcQTwFspd3yD65VohhpuuCOmLASjC" crossorigin="anonymous">
    <script src="https://code.jquery.com/jquery-3.6.1.min.js" integrity="sha256-o88AwQnZB+VDvE9tvIXrMQaPlFFSUTR+nldQm1LuPXQ=" crossorigin="anonymous"></script>
</head>
<body>
</body>
</html>
We have now loaded a blank page with the bootstrap 5 framework and jQuery. These are needed later for the formatting of the multi step form and the dynamic part clicking through the multi step form.
We're now making the html for the steps I'll do one first and later we can just duplicate it. First a bootstrap container which is centered in the page. In that container we create a bootstrap card. We will change the body of the card at every step. What is also important is that we put d-block at the first card, which means that it is visible onloading of the website.
<div class="container d-flex justify-content-center pt-5" style="min-width:720px!important">
	<div class="col">
  <div class="card ">
  <div class="card-header"><h2>Multi step form</h2></div>

  <div class="card-body step-1 d-block p-5 current" data-panel="1">
   <h1>Content frame 1 </h1>
   </div>
</div>
</div>
We have now made a card but we are still missing a progress bar to show how far we are. To create a dynamic progress bar we place the code below above the div with class card and below the div with class col.
    <div class="progress mt-3 mb-3" style="height: 30px;">
      <div class="progress-bar progress-bar-striped progress-bar-animated" style="font-weight:bold; font-size:15px;" role="progressbar" aria-valuemin="0" aria-valuemax="100"></div>
    </div>
As you can see, we are still missing some buttons to click next but also back. We create these buttons below. We put these buttons in the footer of a card.
  <div class="card-footer">
    <button class="btn btn-success d-none" id="back">Back</button>
    <button class="btn btn-primary float-end"  id="next">Next</button>
    <button class="btn btn-secondary float-end d-none" id="done">Done</button>
  </div>
Each button has its own id, so we know which button is clicked.
We have now almost finished the website, only we still have to copy the first step to several steps. Copy the card body four more times and place it under the first card body.
Important: when copying is that you change d-block to d-none and also adjust the step numbers so step-1 to step-2 and data-panel-1 also to data-panel-2 as often as how many steps you want in the multi-step form. In this tutorial we make a 5 steps multi step form.
  <div class="card-body step-1 d-block p-5 current" data-panel="1">
<h1>content frame 1 </h1>
   </div>

  <div class="card-body step-2 d-none p-5" data-panel="2">
   <h1>content frame 2 </h1>
   </div>

  <div class="card-body step-3 d-none p-5" data-panel="3">
   <h1>content frame 3 </h1>
   </div>

  <div class="card-body step-4 d-none p-5" data-panel="4">
   <h1>content frame 4 </h1>
   </div>

  <div class="card-body step-5 d-none p-5" data-panel="5">
   <h1>content frame 5 </h1>
   </div>
We have now completed the website section. To get the dynamic part through which we can click through the different steps, we need JavaScript. We create a file multi-step-form.js and fill it with the code below. Enter the file location in the head of your website just above the </head> element.
<script src="multi-step-form.js"></script>
In the JavaScript file we have written which function does what so that you get an insight into how the multi-step-form.js file works. When you have completed this tutorial you can extend this multi step form with, for example, dynamically loading content via AJAX requests at every step.
Javascript code in the multi-step-form.js file
$(document).ready(function(e) {
'use strict';

/*
* Determine how many steps we have
*/
const numberPanels = $('[class^="card-body step-"]').length;

/*
* We set clicked on null
*/
var clicked = null;

/*
* What happens when we click on the done button, we reload the multi step form
*/
$("#done").on("click", function () {
location.reload();
});

/*
* The stepProgress function handles the position of the progrress bar
*/
var stepProgress = function(currstep) {
var percent = parseFloat(100 / $('[class^="card-body step-"]').length) * currstep;
percent = percent.toFixed();
$(".progress-bar")
    .css("width", percent + "%")
    .html(percent + "%");
};

/*
* PanelNavigator is the main function which makes the steps possible
*/
  function panelNavigator() {

  /*
  * Determine what the current step is
  */
  let step = Number($('.current').attr('data-panel'));


  /*
  * If the string clicked is true the next button is clicked false the back button is clicked
  * When the back button is clicked we move a step back. When the next button is clicked we
  * move a step forward.
  */
  if (clicked == 'true') {
      $('.current').removeClass('d-block');
      $('.current').addClass('d-none');
      $('.current').removeClass('current');
      $('.step-' + (step + 1)).removeClass('d-none');
      $('.step-' + (step + 1)).addClass('d-block');
      $('.step-' + (step + 1)).show().addClass('current');
  } else if (clicked == 'false') {
      $('.current').addClass('d-none')
      $('.current').removeClass('current');
      $('.step-' + (step - 1)).removeClass('d-none');
      $('.step-' + (step - 1)).addClass('d-block');
      $('.step-' + (step - 1)).show().addClass('current');
    }

/*
* Determine what the current step is
*/
step = Number($('.current').attr('data-panel'));

/*
* If step is higher than 1 we show a back button
*/
  if (step > 1) {
      $('#back').removeClass('d-none');
  }


/*
* If the first step is shown no need to show the back button
*/
if (step == 1) {
      $('#back').addClass('d-none');
    } else if ($('#next').hasClass('d-none')) {
      $('#next').removeClass('d-none');
}


/*
* If it is not the last step hide the done button
*/
if (step < numberPanels) {
      if ($('#done').hasClass('d-block')) {
         $('#done').removeClass('d-block');
         $('#done').addClass('d-none');
         }
    }


/*
* If it is the last step show the done button which reloads the form
*/
if (step + 1 == numberPanels + 1) {
      $('#next').addClass('d-none');
      $('#done').removeClass('d-none');
      $('#done').addClass('d-block');
      }
/*
* calling stepProgress to increase or decrease the progress bar
*/
stepProgress(step);
}

/*
* when the next button is clicked execute panelNavigator function
*/
$('#next').click(function(e) {
    clicked = 'true';
    panelNavigator();
});

/*
* when the back button is clicked execute panelNavigator function
*/
$('#back').click(function(e) {
clicked = 'false';
panelNavigator();
});


/*
* execute panelNavigator function to start on load of the page
*/
panelNavigator();
});
Published 2022-10-15T16:10:07 by Constan van Suchtelen van de Haere
no comments on this article, or your comment is not yet approved!
Create website search engine in PHP Why a search engine on your website? What requirements mus..
15-01-2023 0 reacties
Multi step bootstrap responsive form Today we are going to make a responsive multi step form with bootstrap 5 and jquery. The multi step form consists o..
15-10-2022 0 reacties2022 © HostingBe.com CMS versie 2.2.2 ![]()